Why Your KBK Crane is Hard to Push? 5 Common Installation Errors That Ruin Smooth Operation | 2025
KBK crane systems revolutionize material handling through lightweight, modular designs enabling effortless manual operation. However, many facilities experience frustrating operational problems when cranes become difficult to push, requiring excessive force and causing operator fatigue. These issues don’t stem from design flaws but rather from preventable installation errors that compromise the system’s inherent smooth operation. Understanding why your KBK crane is hard to push enables implementing corrective measures restoring proper function. This comprehensive guide examines five critical installation mistakes causing excessive rolling resistance, provides systematic troubleshooting procedures, and delivers proven solutions ensuring your KBK crane operates as smoothly as intended. Whether dealing with newly installed systems or deteriorating performance in existing installations, mastering these fundamental principles restores effortless crane movement while preventing premature component wear and operator injuries from excessive physical strain.

Understanding KBK Crane Design and Operation Principles
How KBK Cranes Achieve Effortless Manual Operation
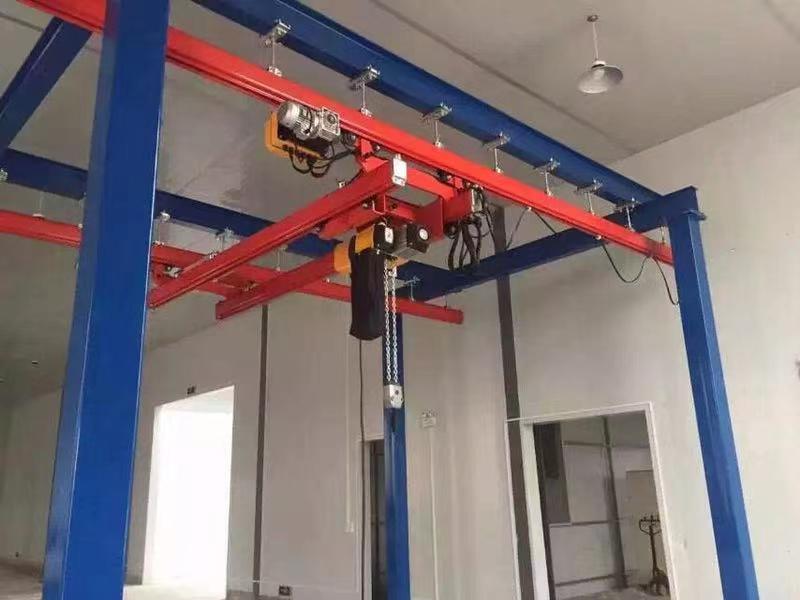
KBK crane systems achieve remarkably smooth operation through precision-engineered components and careful system balance. The modular aluminum track system provides lightweight yet rigid runways for trolley travel. Precision roller bearings within trolleys minimize friction enabling movement with minimal force. Specifically, properly installed KBK cranes require only 2-5 kg of horizontal force to initiate movement of loads up to 2000 kg, representing exceptional mechanical advantage. This effortless operation results from optimized bearing design, precise track geometry, and proper system alignment working harmoniously.
The suspension system equally distributes crane weight and load forces across support points preventing localized stress concentrations. Track profiles maintain precise tolerances ensuring consistent bearing contact throughout travel ranges. Furthermore, sealed bearings protect against contamination while requiring minimal maintenance. When all components function correctly, operators easily move heavy loads using single-hand effort. However, installation errors disrupt this delicate balance causing dramatic increases in required operating force.
Normal Operating Forces vs Problem Indicators
Understanding normal KBK crane operating characteristics enables identifying problems early. New, properly installed systems exhibit smooth, consistent movement throughout entire travel ranges. Starting force should equal running force with no binding, sticking, or jerky motion. Trolleys coast smoothly when pushed continuing movement briefly after force application stops. Additionally, loads remain stationary when released without drifting or creeping indicating proper brake function and level installation.
Problem indicators include excessive force required starting movement, increasing resistance during travel, binding at specific locations, unusual noise during operation, and uneven or jerky motion. These symptoms suggest installation errors requiring investigation and correction. Moreover, comparing operation to manufacturer specifications provides objective assessment. If operating forces exceed published values by 50% or more, significant problems exist demanding attention before continued operation causes component damage or operator injuries.
Component Interaction and System Balance
KBK crane performance depends on precise interaction between numerous components. Track alignment affects trolley bearing contact patterns. Support spacing influences track deflection under load. Hoist positioning impacts load distribution. Subsequently, any single component installed incorrectly affects overall system function. This interdependence means installation requires systematic approach ensuring all elements work together properly.
System balance proves particularly critical. Unbalanced loads cause trolleys to drift or bind. Improper hoist mounting creates side loading accelerating bearing wear. Track twist from misaligned supports binds trolley movement. Therefore, achieving smooth operation demands attention to every installation detail ensuring components function as designed rather than fighting each other.
Installation Error #1: Improper Track Alignment
Understanding Track Alignment Requirements
Track alignment represents the most critical factor affecting KBK crane operation. Manufacturers specify tight alignment tolerances typically ±2mm over 3-meter spans for straightness and ±3mm for parallel track spacing. These precise requirements ensure trolley bearings contact tracks properly without binding or excessive wear. Furthermore, tracks must maintain consistent elevation and remain free from twist throughout installation lengths.
Alignment problems manifest in various ways depending on error type and severity. Horizontal misalignment causes trolleys to bind or jam particularly at support points. Vertical misalignment creates high and low spots causing jerky motion and uneven loading. Track twist binds trolleys preventing smooth rolling. Consequently, even small alignment deviations significantly impact operating forces and system longevity.
Common Alignment Mistakes During Installation
Many installers underestimate alignment precision requirements treating KBK systems like heavy-duty overhead cranes tolerating larger variations. However, the lightweight design and precision bearings demand much tighter tolerances. Common mistakes include failing to use proper alignment tools, relying on visual estimation rather than measurement, and neglecting to verify alignment after tightening support connections.
Building structure irregularities complicate alignment. Concrete columns rarely stand perfectly plumb. Steel beams exhibit camber and deflection. Additionally, existing structures may have settled or shifted over time. Installers must compensate for these conditions rather than simply following building geometry. Failure to account for structural imperfections transfers misalignment to crane tracks causing operational problems.
Temperature effects also impact alignment. Aluminum tracks expand approximately 0.024mm per meter per degree Celsius. Long track runs experience significant length changes across temperature ranges. Therefore, installations must accommodate thermal expansion through proper support design and expansion joint placement. Rigid connections constraining thermal movement create binding and potential structural damage.
Step-by-Step Alignment Verification Procedures
Proper alignment verification requires systematic measurement at multiple points throughout installation. Begin by establishing reference lines using laser levels or precision string lines. These references provide comparison standards for track position verification. Mark support locations precisely ensuring consistent spacing per design requirements.
Install support brackets temporarily allowing adjustment before final tightening. Mount track sections connecting joints per manufacturer procedures. Subsequently, measure track position at multiple points comparing against reference lines and specifications. Check both horizontal and vertical alignment plus spacing between parallel tracks. Record all measurements documenting as-built conditions.
Adjust supports as needed achieving specified tolerances. This iterative process requires patience as correcting one location may affect adjacent areas. Use precision shims at support points fine-tuning position. Once alignment meets specifications, tighten all connections to proper torque values. Finally, recheck alignment after tightening as connection torquing can shift positions slightly.
Perform dynamic verification by operating trolleys throughout travel ranges. Smooth, consistent movement without binding confirms proper alignment. If resistance varies or binding occurs at specific locations, additional alignment adjustment proves necessary. Don’t accept “close enough” as inadequate alignment causes progressive problems over time.
Solutions for Correcting Misaligned Systems
Correcting alignment in existing installations follows similar procedures as initial installation but may require partial disassembly. First, thoroughly document current alignment measuring deviations from specifications. This assessment guides correction planning identifying worst areas requiring priority attention.
Loosen support connections allowing track repositioning. Use precision measurement tools verifying position before retightening. In some cases, support brackets may require repositioning or shimming to achieve proper geometry. Severely misaligned installations may need support point relocation, though this proves disruptive and expensive.
For long track runs experiencing thermal binding, install expansion joints allowing thermal movement without creating alignment problems. These joints accommodate length changes while maintaining trolley support. Position joints strategically based on installation length and expected temperature variations.
After corrections, conduct thorough operational testing throughout entire travel range under various load conditions. Verify operating forces fall within manufacturer specifications. Document corrected alignment providing baseline for future inspections. Establish regular alignment verification schedules detecting deterioration before operational problems develop.
Installation Error #2: Incorrect Support Spacing and Attachment
Understanding Support Requirements and Load Distribution
KBK crane tracks require proper support spacing distributing loads appropriately preventing excessive deflection. Manufacturers specify maximum support spacing based on track profile, load capacity, and hoist positioning. Typical specifications range from 3-6 meters depending on system configuration. Exceeding these limits causes track sagging under load increasing rolling resistance and stressing components.
Support spacing affects system rigidity and dynamic behavior. Widely spaced supports allow greater deflection requiring more force moving loads. Furthermore, excessive deflection creates wave-like track deformation as loads travel causing jerky motion and increasing bearing wear. Conversely, overly close support spacing proves unnecessary and increases installation costs without operational benefit.
Load distribution depends on support arrangement and hoist position relative to supports. Loads centered between supports create maximum deflection and stress. Consequently, support spacing design considers load envelope ensuring adequate stiffness throughout operating range. Special attention to bridge crane configurations where multiple trolleys operate simultaneously proves essential preventing overload conditions.
Common Support Spacing Mistakes
Many installations exhibit support spacing exceeding manufacturer specifications particularly in cost-reduction efforts minimizing support quantities. However, savings in support hardware costs far outweigh operational problems and accelerated wear from inadequate support. Additionally, some installers apply support spacing rules from one track profile to different profiles without recognizing varying structural properties.
Building structure limitations sometimes force compromise on ideal support locations. Installers may extend spacing reaching available building attachment points rather than adding intermediate supports. While understandable, such compromises sacrifice performance and reliability. Moreover, failing to account for load positioning relative to supports causes localized overloading and excessive deflection.
Support attachment strength represents another common oversight. Weak or improperly installed supports allow movement under load defeating track alignment and creating binding conditions. Building structure adequacy requires verification before installation commences. Retrofitting supports to inadequate structures proves problematic and expensive.
Proper Support Installation Techniques
Correct support installation begins with accurate layout marking locations per approved design. Verify building structure adequacy at each support location before proceeding. If structure proves inadequate, implement reinforcement or relocate supports to stronger attachment points. Never proceed with installation onto questionable structure.
Install support brackets using appropriate fasteners for building material and loading conditions. Concrete attachments typically require expansion anchors or chemical anchors properly sized for applied loads. Steel structure attachments use bolted connections with adequate bolt size and quantity. All connections must achieve specified strength values with appropriate safety factors.
Level and align support brackets before track installation. This preliminary positioning simplifies subsequent track alignment. Use precision levels and measuring tools ensuring accuracy. Temporarily secure brackets allowing adjustment during track installation then perform final tightening after alignment verification.
Consider dynamic loading when sizing supports and attachments. Moving loads create impact forces exceeding static values. Manufacturers provide guidance on dynamic factors applicable to specific installations. Always include appropriate safety margins accounting for load variations and potential abuse.
Reinforcing Inadequate Support Systems
Existing installations with inadequate support spacing require reinforcement preventing progressive deterioration. Assessment begins with measuring actual spacing and deflection under load. Compare measurements against manufacturer specifications determining deficiency magnitude. Severe deficiencies warrant immediate correction while minor variations may justify monitoring.
Add intermediate supports reducing spacing to acceptable levels. New support installation requires careful attention avoiding disruption to track alignment. Support existing track temporarily during new support installation preventing uncontrolled deflection. Once new supports install, transfer loads gradually ensuring smooth transition.
In situations where intermediate support addition proves impractical, consider track reinforcement increasing stiffness without additional supports. Some manufacturers offer reinforcement profiles or bracing systems increasing load capacity. However, this approach requires engineering analysis ensuring adequacy and compatibility with existing components.
After reinforcement, conduct load testing verifying performance improvement. Measure deflection under operating loads confirming compliance with specifications. Operating force measurements provide additional verification that corrections achieved desired results. Document modifications creating updated system drawings for future reference.
Installation Error #3: Track Joint Assembly Problems
Importance of Proper Joint Assembly
Track joints connect individual sections creating continuous runways for trolley operation. Properly assembled joints maintain track alignment and geometry enabling smooth trolley transition between sections. Manufacturers design joint systems achieving minimal discontinuity through precision-machined components and specific assembly procedures. However, improper assembly creates steps, gaps, or misalignment causing trolleys to bind, jump, or experience excessive wear.
Joint quality directly impacts overall system performance. Even minor joint imperfections multiply across multiple joints throughout travel ranges. A 0.5mm step at each joint becomes 5mm total deviation over ten joints causing noticeable resistance and jerky operation. Therefore, meticulous joint assembly proves essential for smooth crane function.
Joint hardware must achieve specified torque values maintaining connection integrity under dynamic loading. Loose joints deteriorate rapidly allowing increased movement and misalignment. Conversely, over-tightened fasteners may distort tracks creating different problems. Following manufacturer torque specifications exactly ensures proper joint function and longevity.
Common Joint Assembly Errors
Many installers fail to thoroughly clean joint surfaces before assembly. Manufacturing residues, dirt, or debris prevent proper seating causing misalignment. Track end squareness affects joint quality. Damaged or improperly cut track ends prevent flush connection creating steps or gaps. Furthermore, some installers force misaligned tracks together rather than correcting alignment before joint assembly.
Incorrect hardware installation represents another frequent error. Missing components, wrong sizes, or improper tightening sequences compromise joint integrity. Some installations exhibit mixed hardware from different manufacturers creating compatibility problems. Additionally, failure to use specified lubricants or sealants where required affects joint function and durability.
Temperature effects during installation impact joint assembly. Cold conditions may require joint gap adjustments accommodating subsequent thermal expansion. Hot conditions reverse this consideration. Neglecting temperature compensation creates binding or separation problems as ambient conditions change throughout seasons.
Correct Joint Assembly Procedures
Proper joint assembly begins with preparation. Inspect track ends ensuring squareness, cleanliness, and freedom from damage. Remove burrs or irregularities using appropriate tools. Clean joint surfaces thoroughly eliminating contaminants preventing proper contact. Verify joint hardware completeness and correct sizing before beginning assembly.
Position tracks maintaining proper alignment during joint connection. Use alignment fixtures or temporary supports preventing movement during assembly. Insert joint connectors per manufacturer instructions ensuring correct orientation and full engagement. Begin fastener tightening using specified sequence and torque values. Staged tightening sequences prevent distortion maintaining joint geometry.
After tightening, verify joint quality through measurement and observation. Check alignment across joints using straightedges or precision instruments. Measure steps or gaps confirming compliance with specifications typically requiring less than 0.3mm deviation. Operate trolleys across joints verifying smooth transition without binding or impact.
For long installations, account for thermal expansion through proper joint gap sizing. Manufacturers provide guidelines for expansion joint spacing and gap dimensions based on installation length and temperature range. Follow these recommendations preventing thermal binding or separation problems.
Correcting Defective Joint Assemblies
Correcting joint problems requires disassembly and reassembly following proper procedures. Document existing conditions before disassembly identifying specific deficiencies. Completely disassemble problematic joints cleaning all components thoroughly. Inspect for damage requiring replacement rather than reuse of compromised parts.
Verify track end condition. Damaged ends may require trimming and refinishing creating square, clean surfaces. Use appropriate cutting tools and techniques preventing additional damage. Deburr cut edges thoroughly ensuring smooth surfaces. Clean tracks completely before reassembly.
Reassemble joints following correct procedures meticulously. Don’t rush this process as quality joint assembly requires patience and precision. Use new hardware if any question exists regarding existing hardware condition or compatibility. Achieve specified torque values using calibrated tools ensuring uniform fastener loading.
Verify corrections through operational testing. Trolleys should traverse repaired joints smoothly without detectable transition. Measure alignment and joint quality documenting compliance with specifications. Compare operating forces before and after correction quantifying improvement. Properly corrected joints restore smooth operation throughout affected areas.
Installation Error #4: Contamination and Lack of Proper Lubrication
Understanding KBK Crane Lubrication Requirements
KBK crane systems utilize precision ball bearings requiring proper lubrication for smooth operation and longevity. Manufacturers specify lubricant types and maintenance intervals based on operating conditions and duty cycles. Most systems use grease-packed sealed bearings providing long service life with minimal maintenance. However, initial installation lubrication and periodic maintenance prove essential preventing premature wear and excessive rolling resistance.
Track surfaces require minimal lubrication unlike older crane designs with sliding contacts. The rolling bearing design eliminates sliding friction inherently. However, some applications benefit from light lubrication of track surfaces particularly in contaminated environments or high-duty cycle operations. Excessive lubrication attracts contamination creating problems rather than improvements.
Environmental conditions significantly impact lubrication requirements. Dusty environments necessitate increased maintenance intervals. High-temperature applications require special lubricants maintaining properties at elevated temperatures. Similarly, cold environments need lubricants remaining fluid at low temperatures. Proper lubricant selection and maintenance schedules account for actual operating conditions rather than assuming standard recommendations suit all applications.
Contamination Sources and Effects
Contamination represents a primary cause of excessive rolling resistance in KBK systems. Dirt, dust, metal particles, or other debris infiltrates bearings and track surfaces increasing friction dramatically. Even small contamination quantities significantly impact performance as precision bearings operate with tight tolerances where particles cause interference.
Common contamination sources include dusty work environments, metal grinding or machining operations, concrete dust from construction activities, and outdoor installations exposed to weather. Additionally, poor housekeeping allows contamination accumulation on tracks and trolleys. Some facilities operate cranes in areas with airborne oil mist or chemical vapors coating surfaces and attracting dirt.
Contamination effects compound over time. Initial light contamination increases friction modestly. However, continued operation with contamination causes accelerated bearing wear generating additional particles. This self-reinforcing cycle rapidly deteriorates performance requiring major maintenance or component replacement. Therefore, preventing contamination proves far more effective than addressing consequences.
Proper Lubrication and Cleaning Procedures
Establishing effective lubrication and cleaning programs maintains KBK crane performance. Begin with manufacturer recommendations as baseline guidance. Adapt procedures based on actual operating conditions potentially increasing maintenance frequency in challenging environments. Document maintenance activities tracking effectiveness and identifying optimal intervals.
Cleaning procedures depend on contamination type and severity. Light dust accumulation responds to compressed air or vacuum cleaning removing loose debris. Stubborn deposits may require solvent wiping using appropriate cleaners compatible with system materials. Avoid harsh chemicals potentially damaging seals or finishes. Clean tracks, trolleys, and accessible bearing areas regularly preventing contamination buildup.
Lubrication procedures follow manufacturer specifications regarding lubricant type, quantity, and application points. Most sealed bearings require no routine lubrication throughout design life. However, external bearing surfaces and track contact points may benefit from light lubrication in appropriate applications. Use specified lubricants exclusively as incompatible products cause problems rather than benefits.
For systems operating in extremely contaminated environments, consider protective measures beyond routine maintenance. Track covers or bellows prevent contamination infiltration. Sealed trolley designs offer enhanced protection. More frequent maintenance intervals compensate for aggressive operating conditions. Balance protective measure costs against contamination-related problems and component replacement expenses.
Restoring Contaminated Systems
Heavily contaminated systems require thorough cleaning before normal operation resumes. Assess contamination severity determining appropriate restoration approach. Light contamination may respond to intensive cleaning while severe contamination necessitates component disassembly and possible replacement.
Complete system cleaning involves removing trolleys and hoists for separate attention. Clean track surfaces thoroughly using appropriate methods for contamination type. Inspect tracks for damage including scoring, pitting, or corrosion requiring repair or replacement. Clean support components and connection hardware removing accumulated debris.
Disassemble trolleys carefully following manufacturer procedures. Clean all components thoroughly including bearings, wheels, and structural elements. Inspect bearings for damage. Rough feeling, noise, or visible damage indicates replacement necessity. Clean bearing housings completely before installing new bearings. Use proper installation techniques preventing damage during reassembly.
After cleaning and component replacement, lubricate per specifications. Conduct thorough testing verifying restoration success. Operating forces should return to acceptable levels with smooth, consistent movement throughout travel ranges. Document restoration activities establishing baseline for subsequent maintenance. Implement enhanced protection measures preventing contamination recurrence.
Installation Error #5: Improper Hoist and Trolley Installation
Understanding Hoist-Trolley-Track Integration
KBK crane hoists mount to trolleys creating integrated lifting systems. Proper integration ensures balanced load distribution, smooth operation, and long component life. Manufacturers design hoist-trolley combinations as matched systems considering load capacities, dimensions, and operating characteristics. Using incompatible components or improper installation compromises performance and safety.
Hoist mounting affects trolley balance and tracking. Center-of-gravity positioning relative to trolley wheelbase impacts steering and rolling resistance. Improperly mounted hoists create side loading binding trolley movement. Additionally, mounting hardware must achieve specified torque values preventing looseness causing wear and alignment problems.
Load hook positioning below trolley affects pendulum characteristics and operational convenience. Proper hook height provides adequate lifting range while maintaining stability. Excessive drop creates unwieldy pendulum effects complicating load control. Insufficient drop limits lifting capability forcing use in unsuitable applications.
Common Hoist and Trolley Installation Mistakes
Many installations exhibit hoist-trolley mismatches where components come from different manufacturers or product lines without compatibility verification. While physical mounting may succeed, operational characteristics may not optimize. Load capacity mismatches prove particularly problematic where trolleys lack adequate capacity for installed hoist ratings.
Improper hoist mounting represents frequent errors. Loose mounting bolts allow movement causing wear and misalignment. Over-tightened fasteners distort components creating binding. Missing hardware leaves incomplete load paths compromising strength and safety. Additionally, some installers modify mounting interfaces without engineering analysis creating unsafe conditions.
Chain or cable installation affects hoist operation and trolley balance. Twisted chains cause operational problems and premature wear. Improper reeving defeats mechanical advantage or creates unsafe conditions. Furthermore, some installations position hoists improperly relative to trolley wheelbase creating unbalanced conditions binding movement or causing premature bearing wear.
Correct Hoist Installation Procedures
Proper hoist installation begins with compatibility verification. Confirm hoist and trolley match regarding capacity, mounting interface, and operational characteristics. Review manufacturer recommendations ensuring appropriate combination for intended application. Never improvise combinations without engineering evaluation.
Mount hoist to trolley following manufacturer procedures exactly. Use specified hardware with correct sizes and quantities. Apply proper torque values using calibrated tools. Ensure all fasteners engage fully with adequate thread engagement. Install lock washers or thread lockers where specified preventing loosening from vibration.
Verify hoist position relative to trolley wheelbase. Center-mounted hoists provide optimal balance and tracking. Off-center mounting may prove necessary in some applications but requires consideration of induced side loads. Measure hoist position accurately ensuring conformance with design requirements.
Install chain or cable per manufacturer instructions. Verify proper reeving following provided diagrams. Ensure chains run freely without twisting or binding. Adjust chain length providing specified hook height range. Test hoist operation throughout full travel range confirming smooth function without interference or binding.
Correcting Improper Hoist Installations
Correcting hoist installation problems requires systematic assessment and correction. Document existing configuration before making changes. Measure critical dimensions including hoist position, mounting hardware condition, and operational characteristics. Identify specific deficiencies requiring correction.
For loose mounting hardware, disassemble connections completely. Inspect components for wear or damage requiring replacement. Clean mounting surfaces thoroughly. Reassemble using correct hardware and procedures. Achieve specified torque values documenting tightening with calibrated tools.
Incompatible hoist-trolley combinations require replacement with matched components. While expensive, operating mismatched systems risks safety and accelerates wear creating greater long-term costs. Consult manufacturers identifying appropriate combinations for application requirements. Install matched components following proper procedures.
After corrections, conduct comprehensive testing throughout full operating range. Verify smooth operation without binding, excessive force, or unusual noise. Measure operating forces confirming compliance with specifications. Load testing at rated capacity verifies proper function under realistic conditions. Document corrected configuration establishing baseline for future reference.
Systematic Troubleshooting Approach for Hard-to-Push Cranes
Initial Assessment and Data Gathering
Systematic troubleshooting begins with thorough problem documentation. Operators often provide valuable insights regarding problem onset, specific locations, and conditions when difficulties occur. Interview operators gathering detailed descriptions. Determine whether problems existed since installation or developed gradually indicating wear or deterioration.
Conduct visual inspection throughout crane system. Look for obvious problems including misalignment, damage, contamination, or loose components. Document findings photographically creating visual record. Operate crane throughout travel range noting locations where resistance increases or binding occurs. Test at various load conditions as empty, partial, and full load operation may exhibit different characteristics.
Measure actual operating forces using spring scales or force gauges. Compare measurements against manufacturer specifications determining deviation magnitude. Test at multiple locations identifying whether problems concentrate in specific areas or distribute throughout system. Record all measurements creating objective data supporting analysis and correcting verification.
Isolating Specific Problems Through Testing
After initial assessment, conduct targeted testing isolating specific problem causes. Remove load testing trolley movement alone. Significant resistance without load indicates mechanical problems rather than loading issues. Test individual trolleys separately in multi-trolley systems determining whether all exhibit problems or specific units concentrate difficulties.
Disconnect hoist from trolley testing operation separately. If problems disappear, hoist installation requires investigation. Persistent problems indicate track, alignment, or trolley issues. Disassemble and inspect problematic trolleys examining bearings, wheels, and components for wear or damage. Clean components thoroughly removing contamination before reassembly.
Check track alignment at problem locations. Measure horizontal and vertical position plus spacing between parallel tracks. Compare against specifications and adjacent sections. Even small alignment deviations cause operational problems requiring correction. Verify support security and spacing ensuring adequacy.
For intermittent problems, investigate environmental factors. Temperature, humidity, or contamination variations may affect operation differently across conditions. Monitor problems over time correlating with environmental changes. This information guides corrective actions addressing root causes rather than symptoms.
Implementing and Verifying Corrections
After identifying specific problems, develop comprehensive correction plan. Prioritize issues based on severity and impact. Critical safety problems demand immediate attention. Operational annoyances require addressing but may defer for scheduled maintenance. Develop cost estimates for corrections ensuring adequate budget before proceeding.
Implement corrections systematically following proper procedures. Don’t rush repairs as quality correction requires attention to detail. Use appropriate tools and materials. Verify work at each step ensuring quality before proceeding. Cut corners during correction creates recurring problems negating repair benefits.
After completing corrections, conduct thorough verification testing. Measure operating forces comparing against pre-correction values and manufacturer specifications. Test throughout full travel range under various loading conditions. Verify smooth, consistent operation without binding or unusual resistance. Document test results proving correction effectiveness.
Establish monitoring schedule tracking performance over time. Some corrections may degrade requiring periodic adjustment or additional maintenance. Regular monitoring detects deterioration early enabling proactive intervention before major problems develop. Maintain detailed records supporting warranty claims if defective components contribute to problems.
Preventive Measures Avoiding Future Problems
Learning from installation and operational problems guides implementing preventive measures. Enhanced quality control during installation prevents most common errors. Develop detailed installation checklists covering critical steps. Train installers thoroughly emphasizing precision requirements. Verify work quality at multiple stages rather than discovering problems after installation completes.
Establish comprehensive maintenance programs addressing lubrication, cleaning, inspection, and adjustment needs. Follow manufacturer recommendations adapting for actual operating conditions. Document all maintenance activities tracking trends and effectiveness. Preventive maintenance proves far less expensive than corrective repairs addressing neglect consequences.
Operator training reduces abuse-related problems. Operators understanding proper crane operation avoid overloading, impacts, or misuse accelerating wear. Additionally, trained operators recognize developing problems early enabling proactive intervention. Invest in comprehensive training programs creating knowledgeable operator workforce.
Environmental controls minimize contamination and harsh condition effects. Enclosing cranes when practical provides protection. Air filtration reduces airborne contamination. Climate control moderates temperature extremes. While these measures increase costs, benefits through extended equipment life and reduced maintenance often justify investment particularly in severely challenging environments.
Frequently Asked Questions
What causes my KBK crane to be hard to push?
Primary Causes: The most common cause of hard-to-push KBK cranes involves improper track alignment during installation. Even 2-3mm misalignment creates significant binding forcing trolley bearings against tracks at improper angles. Additionally, incorrect support spacing allowing excessive track deflection increases rolling resistance substantially.
Secondary Factors: Contamination in bearings or on track surfaces dramatically increases friction. Improperly assembled track joints create steps or gaps causing trolleys to bind during transition. Furthermore, loose or damaged components generate unpredictable resistance throughout operation.
Solution Overview: Systematic assessment identifying specific problems enables targeted corrections. Measure alignment, verify support spacing, inspect joints, check contamination levels, and examine component condition. Address identified problems following proper procedures restoring smooth operation.
How much force should be required to push a KBK crane?
Normal Force Requirements: Properly installed KBK cranes require only 2-5 kg horizontal force initiating movement of loads up to 2000 kg capacity. This represents approximately 0.25% of suspended load weight demonstrating exceptional mechanical advantage. Operating force should remain consistent throughout travel range without binding or resistance variations.
Problem Indicators: Forces exceeding 10 kg suggest installation problems requiring investigation. Forces varying significantly across travel range indicate localized issues such as alignment problems or defective joints. Progressively increasing forces over time suggest contamination accumulation or component wear developing.
Measurement Methods: Use spring scales or force gauges measuring actual operating forces. Test at multiple locations throughout travel range. Compare measurements against manufacturer specifications determining whether problems exist. Document measurements establishing baselines for future comparison tracking performance trends.
Can I fix alignment problems without complete reinstallation?
Limited Corrections: Minor alignment deviations often correct through support adjustment without complete reinstallation. Loosen support connections, reposition tracks to proper alignment, and retighten achieving specified geometry. This approach works when deviations remain relatively small and building structure permits adjustment.
Severe Misalignment: Severe alignment problems may necessitate partial reinstallation. Track sections might require removal, support relocation, or structural modifications achieving acceptable geometry. Cost-benefit analysis comparing correction expense against continued poor performance guides decision-making regarding correction extent.
Professional Assessment: Consult qualified installers or manufacturer representatives assessing problems and correction options. Their experience identifies practical solutions avoiding unnecessary work while ensuring adequate correction. Investment in professional assessment often saves money compared to trial-and-error correction attempts.
How often should KBK cranes receive maintenance?
Routine Maintenance: Light-duty applications in clean environments may require only quarterly visual inspections with annual comprehensive maintenance. Medium-duty operations benefit from monthly inspections and semi-annual maintenance. Heavy-duty or contaminated environment operation demands weekly inspections with monthly maintenance and quarterly comprehensive servicing.
Key Maintenance Activities: Regular cleaning removes contamination before operational impacts develop. Periodic bearing inspection and lubrication maintains proper function. Alignment verification detects deterioration enabling correction before major problems arise. Additionally, fastener torque checks prevent looseness causing wear and misalignment.
Condition-Based Approach: Monitor actual operating forces and performance characteristics. Increasing resistance or developing problems indicate maintenance needs regardless of schedule. Conversely, consistently good performance may justify extending intervals. Balance preventive maintenance costs against problem correction expenses and downtime losses.
What should I do if problems persist after corrections?
Comprehensive Reassessment: Persistent problems after corrections suggest incomplete problem identification or additional issues. Conduct thorough reassessment examining all potential causes systematically. Previous corrections might have addressed symptoms rather than root causes. Additionally, new problems may have developed during or after correction attempts.
Component Inspection: Disassemble and inspect trolleys, bearings, and tracks for wear, damage, or defects. Components appearing acceptable during visual inspection may show problems during detailed examination. Measure critical dimensions comparing against specifications. Replace worn or damaged components rather than attempting continued operation with compromised parts.
Manufacturer Support: Contact manufacturer technical support describing problems and correction attempts. They possess extensive experience with similar issues and often identify solutions based on symptoms described. Some manufacturers provide on-site assessment services for difficult problems. While this involves costs, professional diagnosis often resolves problems that otherwise resist correction attempts.
How can I prevent installation problems on new systems?
Quality Installation Requirements: Hire experienced installers with proven KBK crane expertise. Verify credentials through references from previous installations. Specify adherence to manufacturer procedures and specifications in contracts. Require detailed quality control documentation proving compliance with requirements.
Installation Oversight: Conduct periodic inspections during installation verifying quality at multiple stages. This proactive approach detects problems early when correction proves simpler and less expensive. Final acceptance testing thoroughly evaluates system performance before accepting completed installation.
Comprehensive Documentation: Require complete as-built documentation including alignment measurements, torque values, and test results. This information proves invaluable for future maintenance and troubleshooting. Additionally, documentation demonstrates installation quality supporting warranty claims if problems develop.
Conclusion
Hard-to-push KBK cranes result from preventable installation errors rather than inherent design limitations. The five critical mistakes examined—improper track alignment, incorrect support spacing, track joint problems, contamination and lubrication deficiencies, and improper hoist installation—account for the vast majority of operational difficulties. Understanding these common errors enables implementing proper installation procedures preventing problems or correcting existing issues restoring smooth operation.
Systematic troubleshooting approaches identifying specific problems enable targeted corrections rather than expensive trial-and-error attempts. Proper correction procedures following manufacturer specifications ensure adequate repairs lasting throughout equipment service life. Furthermore, preventive maintenance and operational monitoring detect deteriorating performance early enabling proactive intervention before major problems develop.
Investment in proper installation, quality components, and comprehensive maintenance delivers excellent returns through effortless operation, extended equipment life, reduced operator fatigue, and minimized downtime. Whether specifying new installations or addressing existing problems, applying principles outlined in this guide ensures KBK cranes operate smoothly as designed supporting efficient material handling operations throughout manufacturing and warehouse facilities.
Safety Disclaimer: This article provides general guidance only. All KBK crane installation, inspection, maintenance, and repair must be performed by qualified professionals following applicable safety standards and regulations. Consult certified engineers, comply with manufacturer specifications, and adhere to local safety requirements before proceeding with any crane modifications or repairs.
Technical Specification Disclaimer: Equipment specifications, installation requirements, and maintenance procedures vary by manufacturer, model, and application. Always refer to manufacturer documentation and consult professional engineers for project-specific requirements. Information presented reflects general industry practices and should be verified for specific circumstances.
Need Expert KBK Crane Installation or Repair Support? Contact qualified crane professionals for technical consultation, installation quality verification, troubleshooting assistance, and comprehensive maintenance programs ensuring your KBK crane systems operate smoothly and reliably.